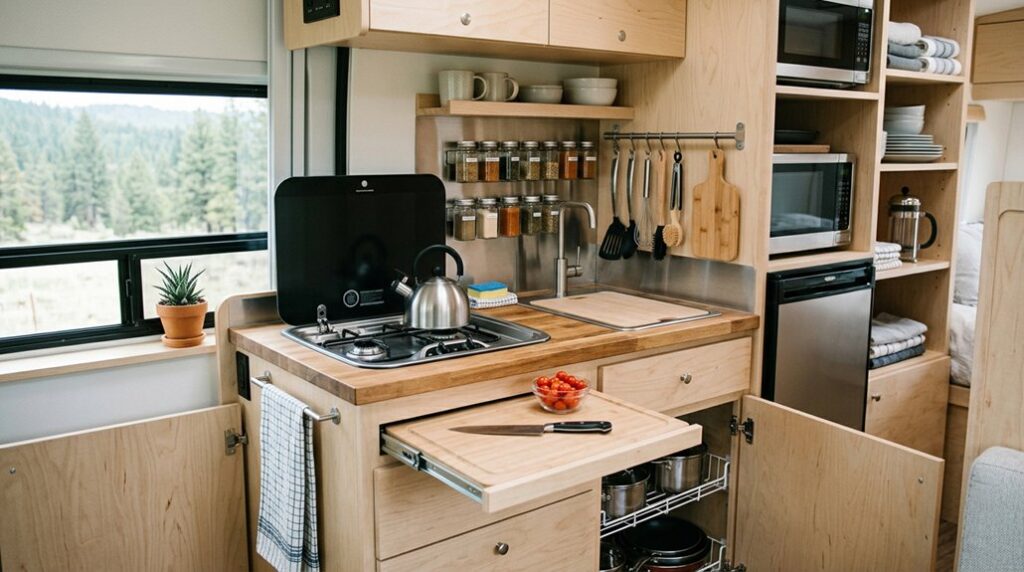
I’ve learned that RV kitchens demand creativity. Your tiny galley kitchen doesn’t have to feel cramped or cluttered. With smart storage solutions, from magnetic strips on walls to pull-out pantry organizers, you can actually fit everything you need.
The trick? Using every inch, including corners and door backs. Want to discover how I improved my cooking space?
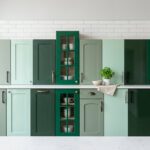
Go Vertical: Wall-Mounted Storage and Magnetic Systems

How much counter space are you wasting in your RV kitchen right now?
How much counter space are you wasting in your RV kitchen right now? Going vertical transforms tight spaces into organized, efficient storage solutions.
I’ve found that going vertical makes the most of tight RV kitchen space. Magnetic strips on your backsplash or inside cabinet doors hold sharp tools and spices securely. They’re incredibly useful! You’ll eliminate drawer clutter instantly.
Wall-mounted storage uses every inch efficiently. I installed adhesive spice racks on my cabinet doors without drilling, perfect for renters. Over-the-door caddies add accessible surface area too.
Here’s what I love most: everything stays visible and within arm’s reach. No more digging through crowded drawers searching for that one gadget. Modular pegboard systems let you reconfigure your setup whenever you need. Hanging baskets keep lightweight items accessible overhead.
Vertical storage isn’t just practical. It makes your RV kitchen feel organized and well-planned. You’re maximizing every square inch while keeping essentials easily accessible. That’s smart RV living.
Maximize Corner Access With Pull-Out Drawers and Sliding Shelves

Why do so many RV kitchens have cabinets that eat your stuff? Those deep corners waste valuable space. I’ve discovered the solution: pull-out drawers and sliding shelves bring buried storage within easy reach.
Here’s what I’m installing:
- Heavy-duty pull-out pantry racks beside the fridge for instant visibility
- Custom deep drawers under the sink that glide smoothly during travel
- Sliding shelves with non-slip liners preventing rattling on bumpy roads
- Rev-A-Shelf retrofit kits converting static cabinets into functional slide-outs
These systems bring the back of your cabinet directly to you. No more reaching blindly! Heavy-duty slides withstand RV vibrations while dividers keep everything organized.
I’m measuring twice, checking compatibility, and finally reclaiming corner access. You’ll love how these upgrades simplify meal prep and actually let you see what you’re storing.
Pack Smart: Collapsible Cookware That Nests Together
I’ve discovered that collapsible bowls and cups like HYDAWAY products shrink down when you’re not using them, making your RV cabinets feel way less cramped. Nesting pots and pans fit inside each other perfectly, so smaller pieces tuck right into larger ones with lids stored alongside; this setup keeps everything organized and super easy to grab during meal prep.
These lightweight, space-saving options give you full cooking power without eating up precious storage, which honestly improves camper kitchen organization.
Space-Saving Nesting Design
Ever wonder where professional RV cooks stash all their pots and pans? I’ve discovered the secret: space-saving nesting cookware. These brilliant sets stack inside each other, eliminating wasted cabinet space.
Here’s what makes nesting cookware so effective:
- Detachable handles fold away, reducing bulk considerably
- Lids nest with their matching pots for organized access
- Sets range from small saucepans to large stockpots in one compact stack
- Brands like GSI Outdoors offer everything you need compactly
I pair my nesting cookware with collapsible containers and vertical storage systems. This combination maximizes my cramped galley kitchen. Collapsible bowls, cups, and storage containers fill remaining drawer space effortlessly. The result? I’ve practically doubled my kitchen capacity without sacrificing cooking capability. That’s the winning formula for RV cooking success.
Travel-Ready Compact Cookware
How do you fit a complete kitchen into an RV the size of a closet? I’ve discovered the answer: collapsible cookware and nesting pots and pans.
I use integrated cookware sets with detachable handles that collapse into one compact bundle. My HYDAWAY bowls flatten to thin discs after use, freeing up precious cabinet space. Collapsible food storage containers and silicone bowls dramatically reduce bulk when I’m traveling.
Here’s what makes this work: nesting lids store directly with their pots, eliminating loose parts everywhere. I pair these space-saving solutions with under-sink organizers to keep everything accessible and organized.
The result? I’ve got a fully functional kitchen without the kitchen-sized mess. My RV feels roomier, and I’m ready for any cooking adventure.
Double Your Door Space: Over-the-Door and Backsplash Storage
I’ve found that your RV kitchen’s doors and backsplash are basically hidden real estate just waiting to work harder for you. You can install cabinet door organizers, backsplash racks with S-hooks, and adhesive solutions, all without drilling a single hole or committing to permanent changes.
Let me show you how I’ve maximized these vertical spaces into efficient storage solutions that keep my galley functional and clutter-free.
Cabinet Door Organization Systems
Your cabinet doors are basically free real estate you’re not using! I’ve improved my RV kitchen storage by installing adhesive storage solutions right on those doors. Cabinet door organizers work brilliantly for tight spaces.
Here’s what I’m storing on my doors:
- Spice racks holding seasoning packets and small bottles within arm’s reach
- Command hooks suspending lightweight utensils away from heat sources
- Adhesive caddies organizing condiments and cooking essentials
- Under-cabinet paper towel holders keeping supplies visible and accessible
These space-saving organizers require zero drilling. I clean surfaces with isopropyl alcohol first, so adhesives stick properly. Check door clearance before mounting anything; you don’t want shelves interfering with closing.
This RV kitchen storage method keeps frequently used items visible without cluttering cabinets. Your cabinet doors become functional zones instantly.
Backsplash Rack Installation Tips
Once you’ve maxed out your cabinet doors, the backsplash becomes your next option for storage! I’ve discovered that adhesive racks and magnetic strips make this often-overlooked space into functional RV kitchen storage. You can mount adhesive spice racks directly behind your stove, instantly freeing up cabinet real estate. Magnetic strips hold metal knives and utensils securely within arm’s reach while cooking.
Command-strip organizers stick temporarily without drilling, which is perfect for renters or those hesitant about permanent changes. Before installing any backsplash storage, I always prep the surface with isopropyl alcohol for better adhesion. Check your door clearance too; you don’t want racks interfering with cabinet closures. These space-saving solutions turn your backsplash into prime storage real estate. You’re joining countless RV enthusiasts who’ve reclaimed kitchen functionality!
Adhesive Solutions For RVs
How much kitchen storage are you leaving on the table? I’ve discovered that adhesive solutions work well in my RV kitchen without permanent damage. Command Strips hold lightweight storage organizers securely on cabinet doors and walls. Here’s what I’m using:
- Spice racks mounted inside cabinet doors using adhesive strips
- Clear organizers displaying olive oil and cooking essentials
- Magnetic strips on backsplashes for hanging utensils
- Small shelves positioned above counters for quick access
These adhesive solutions work brilliantly because they’re removable. When I’m traveling between RV layouts, I simply reposition everything. No drilling required.
The beauty is I’m maximizing vertical space while keeping my counters clear and my favorite tools within arm’s reach. We’re all trying to make our spaces work harder, and adhesive storage organizers do exactly that.
Hang It High: Ceiling-Mounted Racks for Pots and Pans

Ever looked up in your RV kitchen and thought, “There’s all that wasted space”? I did too. That’s when I discovered ceiling-mounted storage. Installing sturdy metal space-saving racks above my galley improved my kitchen significantly. My pots and pans now hang within arm’s reach, freeing up precious cabinet space below.
These suspended racks work brilliantly in tight RV kitchens. I positioned mine carefully to avoid hitting my head and blocking stove venting. The metal construction handles heavy cookware easily. I even added under-cabinet wire baskets underneath for utensils and smaller items.
The best part? My RV kitchen feels bigger and more organized. I can grab what I need while cooking without rummaging through crowded cabinets. It’s practical, accessible, and honestly, it makes me feel competent about RV living.
Organize Spices and Small Items With Magnetic Strips
I’ve found that magnetic strips work well in RV kitchens by keeping spices right where I need them, no more digging through crowded cabinets while cooking! You’ll want to install your strips near the stove or prep area with strong magnets that won’t budge during travel, then organize labeled containers so you can spot exactly what you need at a glance.
Combine these strips with your backsplash or walls to maximize every inch of space without drilling into your precious cabinet storage.
Magnetic Strip Installation
When you’re cooking in a tight RV kitchen, every inch counts, and magnetic strips are incredibly useful! I’ve found that installing them helps you organize spices and wall-mounted storage quickly.
Here’s how I set up my RV kitchen storage:
- Choose adhesive-backed magnetic strips to avoid drilling into cabinets
- Position strips near your stove for quick access while cooking
- Arrange metal spice containers and small utensils on the strip
- Label each holder so you’ll identify coriander and seasonings immediately
The beauty is that there’s no countertop clutter. Your frequently used tools stay visible and reachable. I simply clean the backsplash surface, peel the backing, and press the strip firmly in place. Within minutes, my magnetic strips complement my pegboard system perfectly.
You’ll feel like a kitchen pro organizing your RV space this way!
Spice Container Organization
The best part about magnetic spice strips? They work incredibly well for RV kitchen organization. I’ve ditched my chaotic spice drawer completely. Now I attach small magnetic containers directly to wall-mounted racks near my cooktop, keeping everything visible and accessible while I’m cooking.
You’ll love how quickly you can grab cumin or paprika without rummaging through cabinets. I labeled each magnetic spice storage container clearly so there’s zero confusion during meal prep. The beauty is flexibility, so I rearrange containers seasonally based on what I’m cooking most. Plus, magnetic spice containers prevent spills when you’re driving down the road.
These wall-mounted racks reclaim valuable cabinet space in tight RV kitchens. Once you’ve organized your spices this way, you won’t look back.
Backsplash Placement Strategies
Your backsplash is about to become your RV kitchen’s best-kept secret! I’m talking about using that empty wall space for serious storage optimization with magnetic strips and RV kitchen accessories.
Here’s how I organize mine:
- Adhesive magnetic strips hold metal spice tins in perfectly aligned rows
- A magnetic knife bar keeps my knives secure and drawer-free
- Small labeled containers snap onto strips for seasonings I use daily
- Non-permanent hooks hang measuring spoons within arm’s reach of my stove
Before installing anything, I clean surfaces with isopropyl alcohol. This guarantees strong adhesion. I’m careful to position strips away from heat and cabinet doors that need clearance.
The result? My backsplash now stores what I need most. Everything’s visible, accessible, and my countertop finally has breathing room. That’s real camper kitchen functionality right there.
Secure Loose Items: Stackable Bins and Under-Sink Organization

How do you keep sponges, cleaners, and bags from sliding around every time you hit a bump in the road?
I’ve discovered that stackable bins and under-sink organization create organized systems in a chaotic RV kitchen storage area. Clear, stackable plastic bins let me see everything instantly while securing loose items. I label each bin so supplies return to their designated spots effortlessly.
Under-sink organizers with two-tier sliding systems fit perfectly around plumbing without wasting space. These keep frequently used items reachable and contained.
| Storage Solution | Best For |
|---|---|
| Clear stackable bins | Small items, visibility |
| Wire shelves | Double storage space |
| Under-sink organizers | Cleaners, sponges |
| Two-tier sliders | Vertical organization |
| Labels | Long-term maintenance |
Strategic placement between home and RV means I transport supplies easily. Handles on bins make grabbing what I need simple during travel or setup.
Add Workspace Fast: Drop-Down Counter Surfaces

Once I’ve got my storage locked down with bins and organizers, I can focus on what I really need: actual counter space to cook. Drop-down counter surfaces make a real difference.
Storage keeps your RV organized, but drop-down counter surfaces transform your galley into actual cooking space.
I installed a hinged countertop on the right side of my sink. Here’s what makes it work:
- Folds down when I’m prepping meals
- Stays hidden against the wall when stored
- Gives me precious extra workspace instantly
- Requires zero additional floor space
This space-saving surface lets me chop vegetables, mix ingredients, and plate food without squeezing into corners. When I’m done cooking, I flip it back up.
My RV kitchen storage stays organized, and my galley goes from cramped to capable. You don’t need permanent bulk, just smart, flexible solutions that work when you need them most.
Keep Tools Within Reach: Hanging Organizers Near Your Stove

When I’m cooking in my RV galley, I need my tools fast, not buried in a drawer somewhere. That’s why I installed a hanging organizer right near my stove. I mounted a magnetic strip above the backsplash to hold my spatulas, tongs, and knives. Everything stays organized and within arm’s reach while I’m cooking.
I also added a pegboard system with hooks and baskets next to the stove. Now my most-used utensils are exactly where I need them. For RV kitchen storage that actually works, I mounted adhesive spice racks on my cabinet doors too.
Collapsible tools help reduce bulk. My hanging organizer keeps everything accessible without crowding my tiny counter space. When you’re cooking in tight quarters, having your tools within arm’s reach improves efficiency and workflow.
Choose Compact Appliances That Fit Your Organized Space

Now that you’ve got your tools hanging and ready to go, it’s time to think about the appliances themselves. I’ve learned that choosing compact appliances makes my RV kitchen more functional and less cramped.
Here’s what I prioritize for smart space-saving:
- Stackable pot and pan sets with removable handles that nest together perfectly
- Collapsible bowls and measuring cups that flatten when you’re done cooking
- Slim-depth Instant Pots that slide under cabinets without eating counter space
- Lightweight crockpots that tuck away in RV storage between uses
These compact appliances fit my organized space beautifully. I position them near my sink and stove for easy access during cooking.
Vertical organization matters too. I use wall-mounted racks for frequently grabbed items. When everything has its place, you’re not constantly hunting for what you need.