Did you know that 73% of homeowners say kitchen islands are the most-used feature in their homes?
I’ve discovered that adding the right molding turns a plain island into an eye-catching centerpiece.
Crown molding, beadboard, and geometric trim patterns each bring their own character to your space.
But here’s the thing: choosing the perfect style depends on whether you want timeless charm or modern polish, and I’m going to show you exactly how.
Crown Molding for Timeless, Traditional Islands

Want to know what instantly creates a sophisticated kitchen island? Crown molding does exactly that! I’ve discovered that adding crown molding to your island trim creates architectural interest that makes your space feel carefully planned and polished. It visually lifts your ceilings while complementing your cabinetry for that cohesive traditional look we all want.
Here’s the practical part: I keep mine around 5 inches tall so it doesn’t overwhelm the space. Pairing it with matching baseboard molding extends your island’s presence beautifully. The style you choose matters too; simple profiles work great for modern homes, while ornate detailing suits historic spaces.
Plus, quality crown molding hides minor wall imperfections while boosting your remodel’s perceived value. It’s a worthwhile investment!
Minimalist Trim With Clean Bevels for Modern Kitchens

How do you keep a modern kitchen from feeling cluttered? I’ve found that minimalist trim with clean bevels is your answer. These simple profiles avoid fancy details that weigh down your space.
Beveled edges on baseboard molding create subtle shadow lines. They add definition without looking heavy! I love how they pair perfectly with flat-panel cabinets and monochromatic colors for a unified appearance.
The real magic happens during installation. Tight, gap-free joints and precise caulking preserve that sleek, uninterrupted surface you’re after. It takes precision, but it’s worth it.
For finishing, I recommend painted or stained options that minimize grain visibility. This approach enhances that quiet, contemporary aesthetic we’re all seeking. Your kitchen will feel streamlined and well-considered.
Shaker Trim for Transitional and Hybrid Styles

If you want something that bridges modern simplicity and classic warmth, Shaker trim is your choice. I love how it features clean, flat boards with minimal profiling; no fussy details here. This transitional-hybrid style works beautifully on kitchen islands because it doesn’t compete with your countertops or natural materials.
Pair your Shaker trim with beadboard panels or simple baseboards, and you’ve created something with excellent cohesion. The understated profile lets your island’s best features shine through.
When you’re installing it, I recommend using pin nails with caulk and wood putty for seamless joints. You can finish it via spray, brush, or roller. Either way, careful caulking ensures those tight transitions against walls and cabinetry. That’s the Shaker approach: straightforward and beautiful.
Farmhouse Baseboard With Furniture-Style Feet
Looking to give your island that cozy, cottage-kitchen charm? A farmhouse baseboard paired with furniture-style feet does exactly that. I love how this combination blends traditional trim with freestanding furniture appeal, creating warmth without overwhelming your space.
The wider baseboard anchors your island visually, providing a sturdy foundation. Then those furniture-style feet add vertical detail and charm. They’re the key to mimicking real furniture. You get that charming look without heavy molding or dramatic paneling.
Here’s what makes this approach perfect: it’s affordable and approachable. Even if you’re hesitant about bold design moves, this feels manageable.
Finishing touches matter most. I caulk gaps carefully, apply wood putty at joints, and paint everything to match your cabinetry. That polished result is worth the effort.
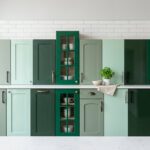
Beadboard Trim Paneling for Cottage Charm
I love how beadboard creates visual interest in a plain kitchen island, giving it genuine character and cottage appeal. You’ll get that classic look with instant texture without needing to remove your whole island.
Once you understand the installation methods and finishing techniques, you can decide whether self-adhesive panels work for you or if permanent trim gives you the cottage charm you’re after.
Classic Cottage Aesthetic Appeal
Want to create a charming cottage centerpiece with your kitchen island? I’ll show you how beadboard molding does exactly that.
Beadboard features vertical grooves that instantly evoke traditional cottage style. I pair mine with simple rail trim and light caps for an airy, well-coordinated look. You don’t need to cover everything; inset sections work beautifully, adding texture without overwhelming your space.
Here’s my practical tip: use moisture-resistant MDF or PVC beadboard in kitchens. These materials handle humidity and cleaning far better than traditional wood.
Combine your beadboard with wider baseboards or cornice molding. This layering creates visual depth that makes your island feel purposeful and polished. The result is a kitchen island that feels inviting and authentically charming, making your entire kitchen more welcoming.
Texture And Visual Interest
How can simple paneling give your kitchen island more character and visual appeal? I’ve discovered that beadboard molding does exactly that. This textured paneling creates dimension and warmth right away.
Here’s what makes beadboard so effective:
- Adds soft, inviting texture that makes your island feel like home
- Works beautifully with cottage or traditional kitchen styles you love
- Creates visual interest without expensive renovations or reconstruction
- Pairs perfectly with other trim details for layered sophistication
I layer beadboard with board-and-batten molding to boost that dimensional effect. You simply attach panels using adhesive and nails, then fill joints with wood putty. A fresh coat of paint or stain coordinating with your cabinetry unifies everything beautifully.
The result? Your island becomes a focal point that brings the whole kitchen together. It’s practical, beautiful, and absolutely achievable.
Installation And Finishing Techniques
The real results appear when you actually install the beadboard and see your island change! I’ve found that pairing beadboard with trim or frame molding creates that perfect board-and-batten look. You’ll want to decide whether you’re covering the base or extending panels; both options work beautifully.
| Installation Area | Best For |
|---|---|
| Island base | Full cottage coverage |
| Extending panels | Mixed open and closed storage |
| Lower sections | Balanced visual weight |
| Upper displays | Lightweight aesthetic |
Paint your beadboard and surrounding molding in colors that complement your cabinetry and countertops. I recommend wider baseboards and light feet or legs to enhance that cottage charm.
This finishing technique makes your island a genuine centerpiece that gives your kitchen a welcoming, lived-in feel.
Craftsman Baseboard With Corbels for Focal Detail

I’m going to show you how Craftsman baseboard with corbels gives your island real visual appeal! You’ll learn what makes this style work: those clean lines and sturdy geometry that reflect quality craftsmanship, and how the vertical corbels create depth that draws attention. Then I’ll walk you through the actual installation steps so you can nail those corners and get that polished, seamless look yourself.
Architectural Details And Elegance
Want to transform your kitchen island from basic storage into a real showstopper?
I’m talking about Craftsman baseboard molding paired with decorative corbels. This combination creates serious architectural interest that makes your island a genuine focal point.
Here’s what you’ll get:
- A chunky, horizontal profile that grounds your island and ties everything together
- Visible support details that add authentic craftsmanship vibes to your space
- An affordable upgrade you can tackle yourself or hire out
- A traditional aesthetic that blends smoothly with mission-inspired kitchen details
The real impact happens when trim meets structural detailing. Your cabinetry, flooring, and countertops suddenly feel connected. Those corbels provide rhythm and visual support cues that improve the whole look.
This approach transforms your kitchen from utilitarian to carefully considered. You’re joining others who’ve discovered that small architectural touches create spaces you’ll actually love living in.
Installation And Design Application
How do you actually bring this Craftsman look to life? I’ll tell you—it’s simpler than you’d think! Start by installing your Craftsman baseboard around the island’s base. Next, add decorative corbels underneath for that handcrafted punch. Here’s my tip: match everything’s stain or paint beforehand. This prevents frustrating color mismatches later.
You’ll want to coordinate trim on nearby cabinets too. This unified approach brings everything together beautifully. The best part? This works whether you’ve got a builder-grade or custom island. You’re getting serious architectural character without breaking the bank.
Those chunky profiles and clean lines will turn your island into a genuine focal point. Your kitchen suddenly feels more intentional, more you.
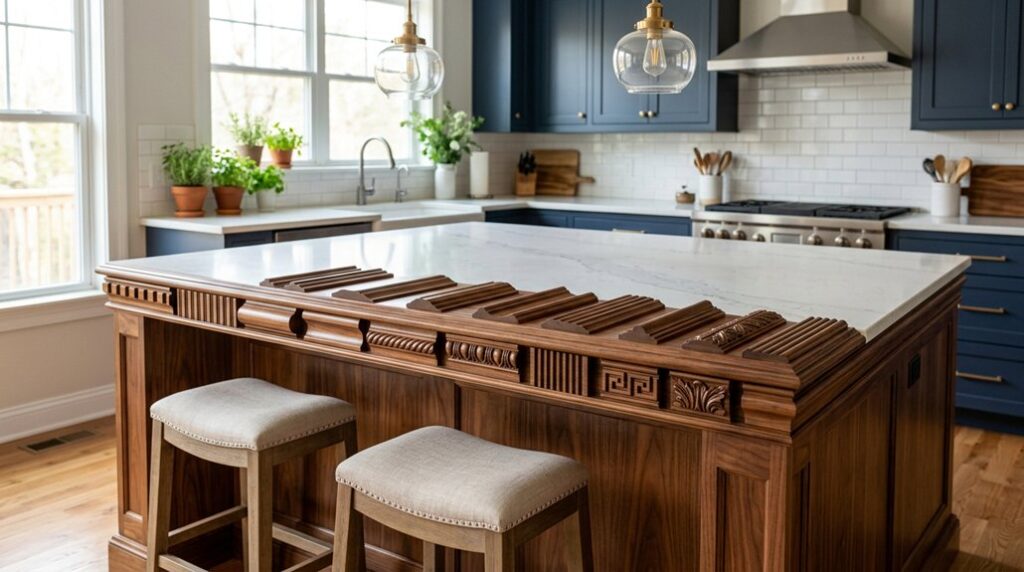
Geometric Trim Patterns With Screen Molding

When you’re ready to give your kitchen island some serious personality, geometric trim patterns with screen molding deliver! I’m talking about creating that basic builder-grade island into something custom and beautiful.
Screen molding lets you create bold, angular designs that become your island’s main attraction. You control everything: the scale, spacing, and arrangement. Want tight geometric lines or dramatic oversized patterns? You’ve got the freedom to choose.
Here’s what makes this approach special:
- Adds instant texture and depth without major reconstruction
- Works perfectly with bold paint colors or contrasting materials
- Creates that tailored, high-end look affordably
- Gives your kitchen island genuine architectural character
The best part? Screen molding does heavy lifting while keeping installation manageable. Your island becomes the room’s conversation starter.
Contemporary Custom Panels With X-Detail Inlays
If you’re craving something that feels truly custom and architectural, thin poplar boards assembled into X-detail inlays are your answer. I love how this technique creates visual interest on an ordinary island. The precision-cut boards form an evenly spaced geometric X pattern that catches light beautifully. What makes it work? Clean joints and consistent depth create that bespoke quality you’re after.
These inlays don’t overwhelm minimalist spaces. They add visual interest without bulk, making them perfect for modern and transitional kitchens. You can go solo with just the X-detail panel, or layer it with beadboard and molding to extend your design across cabinetry. Either way, you’re moving your kitchen from builder-grade to thoughtfully designed.
Board and Batten Trim for Vertical Visual Lines

I’ll show you how board and batten trim creates those gorgeous vertical lines that draw your eye upward on a kitchen island. You’ll learn the straightforward installation methods that make this look achievable without rebuilding your whole island.
Plus, discover how different styles and finishes let you customize the design to match your kitchen’s personality.
Creating Vertical Visual Interest
Ever notice how your eye instinctively travels upward when you see tall, vertical lines? That’s exactly what board and batten trim does for your kitchen island. I love how this technique pairs wide vertical battens with narrower boards, creating impressive height and architectural interest.
Here’s why I’m enthusiastic about this approach:
- Cottage charm meets durability – Beadboard panels with battens protect high-traffic areas while evoking farmhouse vibes
- Visual drama – Contrasting paint colors enhance perceived height and make your island a standout feature
- Defined edges – Vertical battens along the base establish crisp contrast against horizontal countertops
- DIY-friendly – Self-adhesive panels or traditional nails and adhesive make installation accessible
You’ll create an island that feels well-designed and purposeful. This approach works beautifully for anyone seeking that refined, intentional kitchen aesthetic.
Installation Methods and Techniques
Ready to bring those vertical lines to life? I’ll walk you through the installation process, it’s simpler than you might think.
Start by measuring your island carefully. You’ll install wide boards first, then space narrower battens at regular intervals between them. I use pin nails or finish nails to avoid stressing the molding during installation. These smaller fasteners keep everything secure without causing damage.
Seal your joints where pieces meet with caulk. Wood putty fills any nail holes seamlessly. Sand everything smooth once it dries.
This board and batten molding approach gives your island a refined, textured appearance that looks custom-built. You’re not rebuilding, you’re enhancing what you’ve got. Your kitchen will have a polished, intentional look.
Design Customization and Style Options
Now that you’ve got the installation basics down, let’s talk about making this design truly yours. Board and batten molding gives you great freedom to customize your kitchen island in ways that match your personal style.
Here’s what makes this approach so effective:
- Vertical lines that elongate your island and make your space feel bigger
- Mix-and-match finishes that let you coordinate with your existing cabinetry perfectly
- Partial or full wraps so you control how bold your statement becomes
- Pairing options like beadboard that add depth without overwhelming your kitchen
You can paint these boards any color you want. Try coastal whites, warm cottage creams, or bold statement shades. Narrow boards paired with wider battens create that classic architectural look everyone loves.
The customization possibilities are endless. Your island goes from builder-grade basic into a standout focal point that feels authentically yours.
Layered Molding as a Depth-Building Construction Technique

Want to create a custom-built and expensive look for your flat kitchen island? Layered molding is your answer. I’m talking about stacking multiple trim profiles at different depths to create real visual interest around your island’s base.
Here’s what I do: combine a wider baseboard with a narrower trim above it. This stepped, dimensional effect instantly improves any island, even builder-grade ones. You’re basically achieving high-end cabinetry appearance without the reconstruction cost.
The secret is proper caulking and wood putty between layers. These keep joints clean and seamless. Then paint everything consistently so gaps disappear completely.
This depth-building technique works because shadow lines play tricks on your eye. Suddenly your island looks substantial and intentional. That’s the power of layered molding.