
I’ve discovered that your kitchen cabinet ends deserve way more attention than most people give them. Those visible sides can really enhance your kitchen, whether you’re going for clean Shaker panels, trendy shiplap, or something with real character.
But here’s the thing: choosing the right style is just the beginning. The real work happens when you nail the details, the finishes, the measurements, and the installation. So how do you actually pull this off?
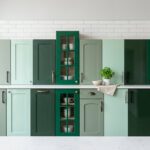
5 End Panel Styles: Shaker, Shiplap, Board & Batten, Open, and X-Motif

Ever wonder why some kitchen islands look so polished and put-together? I’ve discovered it’s all about choosing the right end panel styles. You’ve got five fantastic options to consider.
Shaker panels keep things clean and simple, matching your cabinet doors perfectly. Shiplap creates horizontal lines that feel super modern. Board & Batten gives you vertical structure with real architectural character. Open panels let you display your favorite items while keeping things airy.
Finally, X-Motif patterns bring rustic farmhouse vibes with crisscross designs.
Each style changes your kitchen’s entire look. I love how these end panel styles don’t just hide the sides; they actually showcase your personal style. You’re joining countless homeowners who’ve enhanced their spaces by picking the perfect finish. Which style speaks to you?
Measure Your Cabinet Ends: Getting Dimensions Right

I’ve learned that getting your cabinet end measurements right is absolutely necessary before you order materials or start cutting anything. You’ll want to grab a tape measure and record the height, width, and depth at several spots, not just one, because your walls probably aren’t perfectly square, and those small differences matter significantly.
Once you’ve got all your numbers written down, you can create an exact cut list that’ll make installation smooth and guarantee your new end panels fit perfectly for your space.
Accurate Measurements Matter
Why do so many DIY kitchen projects go sideways? Inaccurate measurements! I’ve learned this the hard way. When you’re measuring cabinet ends, you can’t just eyeball it. I grab my steel tape measure and check height, width, and depth at three spots: top, middle, and bottom.
Why three spots? Cabinets aren’t always perfectly square. I record everything to the nearest 1/16 inch because that tiny difference matters when fitting panels. I use calipers for trim thickness and note any bevels or curves. Then I sketch it all out with photos attached.
This habit saves me from costly mistakes and frustration. Accurate measurements mean your end panels fit beautifully, every single time.
Tools For Precise Assessment
When you’re ready to nail those cabinet end panels, the right tools help you work accurately. I’ve found that a rigid measuring tape is your best friend here. It won’t bend or collapse like flimsy ones do, giving you accurate measurements every time.
I always measure at multiple points along the length, height, and depth. Slight irregularities happen, and catching them matters. I record everything carefully, starting from a fixed reference like the floor or countertop edge.
Here’s my honest tip: grab a second person. Having someone double-check my measurements saves me from costly miscuts later. I sketch a simple diagram labeling each dimension. These measurements prevent frustration and help your end panels fit perfectly.
Recording Dimensions For Installation
Now comes the fun part: writing down all those measurements so your end panels fit like they belong there! I’ve learned that precise dimensions make the difference between a professional-looking installation and frustrating gaps.
I record the height, width, and depth of each cabinet end carefully. Then I note where my mounting hardware goes so nothing interferes with door swings or hinges. I also check for straight, inset, or beveled edges on the existing cabinets. This tells me which trim profiles will work best.
I create a detailed staging plan listing exact material sizes, like my luan sheet dimensions or lattice piece lengths. This planning prevents costly waste. I always double-check tolerances too, accounting for how humidity might affect my finished panels. Getting dimensions right upfront saves me headaches later!
Match Cabinet Doors and Finishes for Seamless End Panel Integration

I’ve learned that choosing cabinet doors matching your existing front doors in color and style creates seamless end panels that blend beautifully. Your end panels should mirror the cabinet finishes exactly.
I recommend using an inset panel design like Shaker style. It aligns perfectly with your door profiles and creates that built-in, polished appearance everyone loves. Start with luan substrate for a smooth surface underneath.
Here’s where the results happen: finish with identical stain or paint as your front doors. Apply three coats with light sanding between each coat. This technique delivers that creamy, integrated look that makes your kitchen feel purposefully designed, not mismatched.
Build Your Own End Panels: What You’ll Need and How to Install
Building your own end panels isn’t as hard as you’d think, and I’m going to show you exactly what materials you’ll need and how to install them. We’ll start by prepping your cabinet face and cutting luan to the right size, then move straight into attaching it securely and finishing it so it matches your doors perfectly.
Materials and Preparation Steps
What’s the secret to professional-looking cabinet ends? Proper prep work! I start by removing old trim carefully. Next, I check that my cabinet face is perfectly even, no bumps or gaps allowed.
For materials, I grab luan plywood sheets and cut them exactly to size. I use short finishing nails or wood glue to attach my cabinet end panel securely without creating any protrusions.
Here’s what matters: matching your panel design to existing doors. If you’ve got Shaker-style doors, go Shaker! Beadboard? Same approach. I measure twice, accounting for door clearance and hinges.
Before installing, I select finishes that coordinate with your cabinetry. Kitchen cabinet end panels take abuse from moisture, heat, and spills. Choose durable materials and matching stain or paint. This ensures everything looks deliberate and works well together throughout your space.
Installation and Finishing Touches
Once your prep work is done, you’re ready to build and install those end panels. I attach my luan plywood using short nails or wood glue, keeping everything flush and smooth. You’ll want to match your panel style to your cabinet doors, whether that’s Shaker or inset design.
A board-and-batten approach works beautifully for most kitchens, including island end applications. I use two side pieces, top and bottom members, and a center piece for visual interest.
Now comes the fun part: finishing. I paint with white first, then color-match to your cabinet doors. Three coats with light sanding between each one creates that creamy, custom look you’re after. Your kitchen will look professionally designed, and you did it yourself.
Color Matching and Multi-Coat Finishing for a Custom Look

How do you get that perfectly polished look that makes your kitchen cabinet ends look like they came straight from a pro? Start with white paint as your base. Then color-match it directly to your cabinet door. I’m talking about using the actual door as your reference, not guessing from a paint chip.
Apply three coats total. Sand lightly between each coat. This creates a creamy white finish, not the harsh bright white that screams DIY.
Your end panels deserve this attention because they’re visible from the side. Reuse existing trim whenever possible. Match the stain or paint sheen with your surrounding cabinetry. The result is a custom look that feels well-planned and matches throughout your kitchen space.
Add Shiplap and Decorative Legs to Your End Panels

Now that you’ve got those end panels looking polished and professional, let’s add shiplap and decorative legs for real impact.
Here’s what makes this combo work:
- Shiplap adds farmhouse texture without a full remodel
- Decorative leg supports create grounded, architectural appeal
- The combination complements both rustic and modern cabinets
- Finish coordination maintains your unified color palette
When you add shiplap to end panels, you’re visually connecting everything together. Your island suddenly looks carefully planned and designed. Pair it with sturdy decorative legs, and you’ve improved your whole kitchen’s style. The legs lift the piece off the ground, creating that custom-built feel we’re all chasing.
Match your shiplap and leg finishes to your existing cabinets. This consistency pulls your space together beautifully. You’re not just updating; you’re creating a kitchen that feels like you.
Design Open Shelf Cabinets With Hutch-Like End Panels
Open shelving creates visual interest in your kitchen when you ground it with hutch-like end panels. You’ll establish visual anchors that feel purposeful and refined, not random. Cabinet end panels that extend to your countertop achieve this grounded look beautifully.
Here’s what I love: contrasting back panels add genuine depth, making displayed items stand out. Add adjustable shelves and sturdy brackets, and you’ll have flexibility to rearrange whenever you want. Glass-fronted doors work wonderfully too. They showcase your favorite pieces while keeping visual heaviness at bay.
The key is keeping everything coordinated. Match your cabinet end panels’ color, hardware, and finish to surrounding cabinetry. This prevents that cluttered, thrown-together feeling. Style with purpose, curate what you display, balancing beauty with practical storage. You’ll create a kitchen that feels uniquely yours.
Non-Permanent Finishes: Fabric, Wallpaper, and Starch Adhesion Methods
What if you could update your kitchen island’s end panels without drilling, nailing, or permanent commitment? I’ve discovered that fabric with liquid starch offers exactly that freedom. Here’s why I love this approach:
- You apply fabric using liquid starch as your adhesive for removable results
- The fabric stays washable and oil-resistant to handle kitchen grease easily
- You can reposition or remove it anytime without damaging surfaces
- Pattern choices let you customize your space while keeping future flexibility
Wallpaper-like fabric gives you texture and design that works well with your cabinetry. The starch method creates firm adhesion that doesn’t require permanent installation.
You’re not locked into one look forever. This approach lets you experiment with colors and patterns that feel right for you, updating whenever inspiration strikes. It’s decorating without the stress.
Transform Your Kitchen Island With Farmhouse, Rustic, or Industrial End Panels

Once you’ve mastered the removable fabric approach, you’re ready for something with more staying power. End panels create a distinctive kitchen island design. I love how shiplap, X-end motifs, or decorative legs instantly add farmhouse charm without gutting your kitchen.
End panels create distinctive kitchen island designs—shiplap, X-end motifs, and decorative legs add farmhouse charm without major renovation.
You’ll need two side pieces, plus a top, bottom, and middle piece for a complete look. Beadboard and tongue-and-groove textures work beautifully for rustic vibes.
Here’s the practical part: use luan as your backing for a flat, professional finish. Secure everything with short nails or glue; this prevents annoying protrusion. Match your panel color to existing cabinet doors. Align hardware carefully. This consistent approach creates visual harmony throughout your space.
The result? A styled focal point that shows thoughtful design. You’ve just improved your kitchen without major renovation costs.
Keep It Practical: Cleaning, Durability, and Maintenance

I’ll keep your cabinet tops looking sharp! Dust and grease love settling on upper cabinets near your stove, so you’ll want materials like sealed wood or painted surfaces that wipe clean easily with a damp cloth.
I’ve found that choosing durable, washable items and keeping decorations minimal saves me tons of cleaning time each month.
Dust And Grease Accumulation
How quickly does grime pile up on top of your kitchen cabinets? You’d be surprised! Dust and grease collect faster than you’d think, especially near your stove. I’ve learned that sticky cooking oils become airborne and settle everywhere above your cabinets.
Here’s what you’re really dealing with:
- Grease buildup increases closer to your cooktop
- Dust combines with oils to form stubborn film
- Cookbooks and décor need frequent wiping
- Items farther from heat collect less residue
The good news? You can manage this! Choose easy-to-clean materials and finishes that resist grease. Wipe surfaces down regularly without worrying about damage.
Store lightweight items securely to prevent accidents. I’ve found that staying on top of cleaning prevents that grimy layer from becoming impossible to remove later.
Material Selection For Durability
Now that you know how to keep grime under control, let’s talk about picking the right materials that’ll actually stand up to your kitchen’s demands. I’d recommend solid wood or plywood with durable finishes for real durability. These materials laugh in the face of moisture and heat, the exact challenges your kitchen throws at them daily.
Skip flimsy luan unless you seal it properly. Honestly, you’ll regret it later. Instead, choose semi-gloss or satin finishes in neutral colors. They’re easier to wipe clean and hide fingerprints better than glossy options.
Here’s my practical tip: match your cabinet doors’ color and finish. This coordination creates a polished look while keeping maintenance simple. You’ll appreciate how these choices age gracefully, staying beautiful for years.
Maintenance Schedules And Cleaning
Since kitchen cabinets face grease, dust, and moisture daily, you’ll want a cleaning routine that actually sticks. I’ve learned that consistency beats scrambling later.
Here’s my maintenance approach that works:
- Wipe cabinet surfaces weekly with a damp microfiber cloth to prevent grease buildup near your stove
- Deep clean above-cabinet areas monthly, removing lightweight decorative items first for easier access
- Check glass-fronted pieces quarterly to ensure securing brackets remain tight and secure
- Reorganize stored items seasonally, discarding what you don’t use and wiping everything down
I’ll be honest: skipping even one week makes the next cleaning tougher. Paint finishes and laminated panels respond beautifully to regular attention.
Your cabinets deserve this care because they’re working hard for your kitchen daily. Keep at it!