over 40% of homeowners with oak cabinets think they’re stuck with that dated 1990s look. But I’m here to tell you that’s not true. Your oak cabinets can absolutely work in 2026.
The key is smart updates that give them a modern, timeless appearance. It’s not about ripping them out. Want to know where to start?
Why Oak Works in 2026 Design
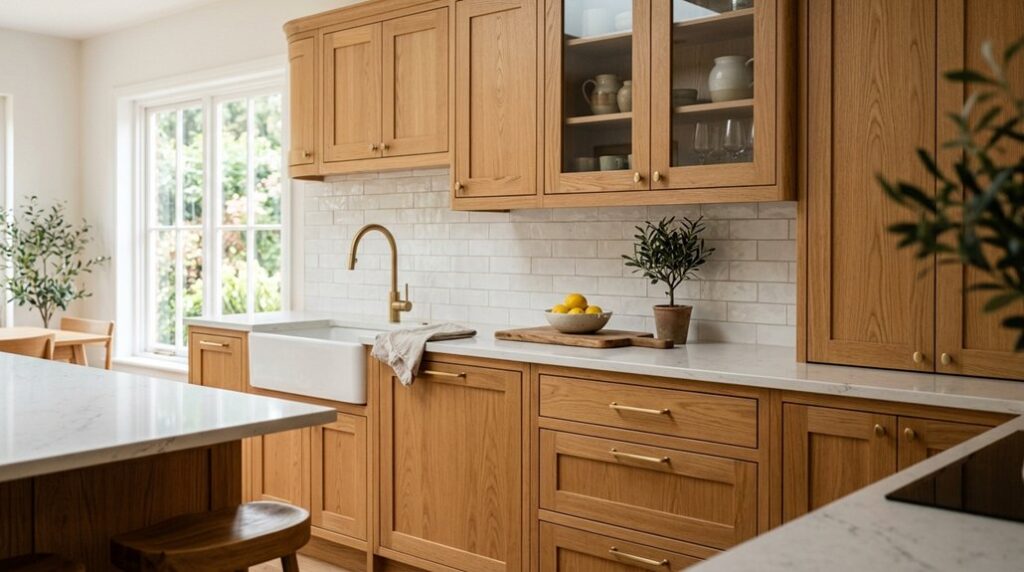
Why’s European White Oak everywhere right now? I’ll tell you: it’s a key cabinetry trend. Fifty-one percent of designers are choosing White Oak for 2026, and honestly, I understand why.
White Oak brings warm undertones without those yellow or red skews that older oak cabinets had. It’s genuinely neutral, working like flooring, a solid architectural foundation for your modern kitchen. You can pair it with soft white walls, warm stone countertops, and champagne hardware without clashing.
Here’s what I love most: it’s versatile. White Oak supports clean-lined modern designs or softens painted cabinetry in transitional spaces. The natural wood tone feels current, not dated. Plus, it’s durable enough for open-concept layouts where your cabinetry really shows.
Updating oak works when you keep door styles simple and skip heavy molding. That’s how you get contemporary warmth.
Restain vs. Paint Your Oak Cabinets

When you’re ready to update your oak cabinets, you’ve got two main paths: restaining for deeper color and modern tones, or painting for a completely fresh look.
I’ll walk you through stain depth selection and the techniques that actually work, so you can pick the method that fits your cabinet style and skill level. The right choice depends on your cabinet profile, the look you’re going for, and how much prep work you’re willing to tackle.
Stain Color & Depth Selection
You have two main routes, and each one gives you a totally different result. When you’re choosing a stain color, darker shades are honestly easier to achieve than lighter ones. I’d recommend going neutral—think warm grays or soft browns. They appeal to more buyers and won’t feel dated next year.
Gel stain offers a modern update without full sanding, sitting right over your existing finish. But here’s the catch: it requires careful technique for consistent results. For true depth selection, full sanding lets you control exactly how dark or light you want that oak to look.
Consider your countertops and surrounding wood. Your cabinets should work well with everything else, creating that well-planned kitchen you’re after.
Paint Vs. Stain Technique
Now that you’ve got your stain color picked out, here’s the bigger decision: should you actually restain those oak cabinets, or would paint work better?
I’ll be honest—restaining updates your look while keeping that wood character. But painting? It modernizes everything, especially those cathedral or double-arch profiles you’ve got.
Here’s my take on prep technique: restaining requires a full sanding for even color absorption. Gel stain sounds easier since it sits on top, but it’s tricky and won’t last long-term.
For your stain vs. paint choice, consider this color trend: neutral tones coordinate beautifully with countertops and flooring. That wood finish matters for resale appeal too.
Both options need serious prep work and skill. Think about your lifestyle and budget before committing to either wood finish approach.
Eight Critical Decisions Before Refinishing

Before you pick up a paintbrush or stain applicator, you’ll want to think through eight key choices that’ll shape your entire project. First, I’d decide whether you’re restaining or painting your oak cabinets. It’s a huge difference!
Decide whether you’re restaining or painting your oak cabinets—it’s a huge difference that shapes your entire project.
Next, consider your cabinet’s profile and age. Then pick your color or finish. Should you go bold or neutral?
Hardware updates matter too. New knobs and pulls change everything instantly. I’d coordinate with your countertops and flooring next. Your kitchen needs that unified appearance.
You’ll also think about full sanding requirements and whether gel stain works for you. Finally, consider resale appeal throughout your decisions. Each choice builds on the last, creating your ideal kitchen together!
Update Hardware First: The Fastest Way to Modernize Oak Cabinets
Of all those eight decisions I just mentioned, swapping out hardware is honestly the quickest win. I’m talking about a genuine hardware update that modernizes your oak cabinets without refinishing. Here’s what makes this DIY makeover so effective:
| Hardware Style | Best For | Why It Works |
|---|---|---|
| Soft lines | Cathedral doors | Avoids sleek, tubular designs |
| Round knobs | All doors | Prevents wood indentations |
| Mixed knobs/pulls | Custom look | Knobs on doors, pulls on drawers |
Measure your bolt hole distances first. This matters! Count every knob and handle you’ll need.
When you pair transitional doors with updated hardware, you’re immediately modernizing your space. You’re creating that bespoke cabinetry feeling without the expense. Round knobs beat square ones every time. This simple swap gives you a contemporary style while honoring your oak cabinets’ character.
Crown Molding for Oak Cabinets

Crown molding sits right on top of your cabinets, not the ceiling, and you can pair it with a 2–3 inch valance underneath to create that custom, high-end look. I’ve found that this combination visually stretches your cabinet height and hides under-cabinet lighting for a polished finish.
Staining both pieces to match your existing oak has the greatest impact, especially on older builder-basic cabinets.
Adding Height and Custom Profile
Want to make your oak cabinets look taller and more polished? I’ve found that adding crown molding and a valance works beautifully. Here’s what I do: I install crown molding on top of the cabinets, not at the ceiling, to create that distinct upper profile you’re after. Then I attach a 2–3 inch valance strip to the bottom of upper cabinets. This combo visually increases cabinet height instantly. The valance also hides under-cabinet lighting beautifully.
Working with aged oak takes effort and patience. But the payoff? Your builder-basic cabinets suddenly look custom-made. If you’re feeling ambitious, add bulkhead filling above cabinets with decorative molding for that high-end appearance. It’s DIY-friendly and rewarding.
Installation Techniques and Stain Matching
Now that you’ve got your crown molding and valance installed, you’ll need to nail the stain matching. Matching wood tones is important for a polished look. You’ll want to test your stain on scrap pieces first. This prevents costly mistakes on visible surfaces.
| Installation Step | Pro Tip |
|---|---|
| Sand all pieces uniformly | Use 120-grit paper for consistency |
| Apply stain in thin coats | Build color gradually for better results |
| Match existing cabinet tone | Test on hidden areas first |
| Seal with polyurethane | Protects against moisture and wear |
Your crown molding and valance should blend with oak cabinets. I recommend visiting the paint store with cabinet samples. Direct sunlight changes how stains appear, so check your samples throughout the day. This extra effort helps your installation look professionally done and consistent across your entire kitchen.
Two-Tone Oak Cabinets and Open Shelving
How do you breathe fresh life into oak cabinets without replacing them entirely? I’ve found that two-tone oak cabinets work beautifully. Paint your upper cabinets while keeping lower cabinets stained in warm tones. This contrast feels modern yet balanced.
Two-tone oak cabinets transform kitchens beautifully—paint uppers, keep lowers stained warm for modern, balanced contrast.
Open shelving near your sink and dining area is a practical choice. I use the same wood species and matching stain for visual continuity. The shelving lightens everything up and makes your kitchen feel spacious.
Here’s what matters: matching hardware. Coordinate your brushed nickel or matte black finishes across cabinets and shelving. Align them with stainless appliances and updated countertops for a polished appearance.
The result? Your oak cabinets become refreshed and inviting. You’re not starting over. You’re joining a smarter design movement.
Match Your Stain to Walls and Flooring

Why does your oak stain choice matter so much? I’ll tell you; it’s the key to bringing your whole kitchen together. When you match your oak stain to your walls and flooring, you create a unified look that shows thoughtful planning.
I recommend choosing lighter stains like grey oak or white oak. They work beautifully with greige, soft white, and muted taupe walls. Skip those orange or yellow stains; they feel dated.
Here’s what I do: I coordinate the stain’s undertones with my wood flooring. Then I pick a stain depth that complements, not competes with, surrounding materials. Adding matte protective coatings tones down grain visibility too.
Consider painting your upper cabinets while keeping lower ones natural wood-stained. This approach lets the warm oak accent rather than dominate your space.
Mixing Light Oak and Walnut Finishes

Ever notice how two different wood tones can actually work better together than one alone? I’ve discovered that pairing Light Oak with Walnut creates something special in 2026 kitchens.
Here’s my strategy: combine warm light oaks like 514 Outer Banks Oak with authentic walnuts such as 784 Karius Walnut or W68 Cognac Walnut. This Blended Finishes approach gives you natural warmth without feeling too dark or cold.
The impact becomes clear when you use planked textures like W77 Nova Itabri alongside lighter cabinets. These pronounced grains create beautiful contrasts that feel deliberate rather than accidental.
I love how this mixing strategy works in open-plan layouts. You’re building material-driven designs that feel cohesive and craft-focused. The result is a balanced, inviting kitchen that doesn’t scream trendy; it whispers quiet sophistication instead.