I’ve learned that kitchen cabinet refacing doesn’t require a complete renovation. You can refresh your kitchen with new paint, hardware, and smart design choices.
Light colors make kitchens feel bigger. Two-tone cabinets add personality. Better lighting changes everything. But here’s what most people miss: testing your colors under actual kitchen lighting matters more than you’d think.
Let me show you why, and what you’ll discover most.
Envision Your Refaced Kitchen: Design Trends for 2025

How’d you like to refresh your tired kitchen cabinets without emptying your wallet on a complete replacement? Cabinet refacing trends for 2025 are all about smart updates that fit your lifestyle. Open shelving is popular right now, making kitchens feel bigger and letting you display dishes you actually love. New cabinet doors in sleek finishes like matte black or natural wood offer significant visual impact.
You’re joining thousands who’ve ditched cookie-cutter cabinets for personalized spaces. The benefit? You’ll skip the construction mess of full replacements. Simple tweaks like adding molding or mixing textures create that polished look everyone wants. Your kitchen becomes distinctly yours.
These 2025 kitchen design ideas prove you don’t need major renovations to feel like you’ve got a brand-new space.
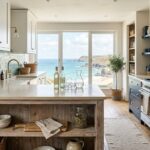
Light Colors and Minimal Styles for Smaller Kitchens

Now let’s talk about making smaller kitchens feel bigger and brighter. Light cabinets are an excellent choice! I’ve found that white, beige, taupe, and greige cabinet refacing options reflect light beautifully, opening up tight spaces instantly.
Light cabinets in white, beige, taupe, and greige reflect light beautifully, instantly opening up tight kitchen spaces.
Here’s my favorite approach: pair light cabinets with a minimal style. Clean lines and simple hardware eliminate visual clutter, making your small kitchen feel more open. The two-tone approach works well too; light uppers with darker lowers add interest without overwhelming the space.
When you’re refacing cabinets in a compact kitchen, these choices matter. Greige and taupe blend gray sophistication with warmth, fitting both modern and traditional homes. Soft white or taupe hardware completes the look seamlessly.
You’ll notice how natural and artificial light bounces around differently. Your small kitchen becomes more spacious and inviting.
Test Cabinet Colors Under Your Actual Kitchen Lighting
I’ve learned the hard way that cabinet colors look totally different on your screen than they do in your actual kitchen, so here’s what I do instead. I grab real swatches and test them in my space at different times.
Morning, noon, and evening work best for observing how the light hits them next to my countertops and backsplash. A color that looked perfect at noon can shift completely when evening light floods in.
Lighting Conditions Impact Color
Ever notice how a paint color looks completely different in the store than it does at home?
That’s because lighting conditions dramatically shape your color perception. When you’re testing color samples for your kitchen cabinets, the store’s bright fluorescent lights won’t match your actual space. I learned this the hard way!
Here’s what I do now: I bring samples home and observe them throughout the day. Morning light looks different from evening light. Warm bulbs create one vibe; cool white bulbs create another. Your color samples will shift before your eyes!
I document everything with photos and notes. This helps me spot real color changes versus my tired eyes playing tricks. This simple step prevents expensive mistakes. You’ll feel confident in your final choice!
Swatch Testing Best Practices
Why does your dream cabinet color look totally different once you bring it home? Digital previews lie. That’s why swatch testing matters so much.
Here’s my approach: I grab actual cabinet samples and test them in my kitchen throughout the day. Morning natural light reveals one vibe. Afternoon sunshine shows another. Evening artificial lighting looks completely different again.
I place swatches on cabinet doors, frames, and islands separately. Each surface responds differently to light. I use ambient overhead lights, task lighting under cabinets, and accent lights to see the full picture.
This testing phase takes time, but it’s worth it. I’m comparing real-world results, not screen images. You won’t have surprises when installation happens. You’ll feel confident knowing your color choice works in your actual space under your specific lighting conditions.
Time Of Day Assessment
Throughout your kitchen, from morning till night, light changes how you see everything. I’ve learned that testing cabinet colors at different times is absolutely crucial. Your real-world swatches reveal truths that digital previews simply can’t capture.
| Time of Day | Lighting Type | Color Perception |
|---|---|---|
| Early Morning | Natural, soft | Cooler tones appear muted |
| Midday | Bright natural | True color shows clearly |
| Afternoon | Warm, golden | Yellows intensify noticeably |
| Evening | Artificial only | Artificial light shifts warmth |
| Night | LED/overhead | Colors appear darker overall |
I recommend holding your samples against cabinets at sunrise, noon, and sunset. Watch how that beautiful sage green changes throughout the day. Notice whether your chosen shade remains consistent or shifts dramatically.
This testing phase prevents expensive mistakes. You’ll feel confident knowing your selection works beautifully under your actual lighting conditions, not just in showroom perfection.
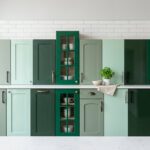
Two-Tone Cabinets: Add Depth and Drama
Want to make your kitchen feel bigger and more interesting? I’ve found that two-tone cabinets do exactly that. Here’s my approach: I pair a soft white on upper cabinets with deeper gray or taupe below. This color pairing creates instant depth and contrast that makes the entire room feel different.
Two-tone cabinets instantly create depth and contrast, making your kitchen feel bigger and more sophisticated than ever before.
Light uppers draw your eye upward, making ceilings feel higher. Darker lowers ground the space beautifully. Together, they create visual drama without overwhelming your kitchen.
I recommend limiting yourself to just two complementary shades. This keeps things polished and coordinated. Add a bold backsplash or contrasting hardware to enhance that layered, dimensional look even more.
The result? Your kitchen looks well-designed, sophisticated, and genuinely larger. You’ll feel like you’ve completely redesigned your space.
Paint, Stain, or Veneer: Which Method Fits Your Skill Level

Now comes the fun part: actually bringing that two-tone vision to life. You’ve got three solid options: paint, stain, or veneer. Each method works differently depending on your comfort level and timeline.
| Method | Skill Level | Time Investment |
|---|---|---|
| Paint | Beginner-friendly | Moderate |
| Stain | Intermediate | High |
| Veneer | Intermediate | Low-moderate |
| Oil-based paint | Advanced | Moderate |
| Latex paint | Beginner | Moderate |
I recommend starting with paint if you’re nervous. Use Benjamin Moore Advance or Sherwin Williams Urethane Enamel for cabinetry.
Veneer refacing attaches clean plywood and self-adhesive sheets. Press slowly to avoid air bubbles. Don’t forget replacing cabinet doors and hardware to complete your finish. Your choice matters; pick what excites you most.
Match Cabinet Colors to Your Countertop and Backsplash
Your cabinet color is the anchor. I’d match it with your countertops and backsplash so everything works together instead of fighting each other. You’ll want to test actual paint samples right in your kitchen under different lighting before committing, since what looks good in the store might surprise you at home!
Coordinating With Fixed Elements
- Check the undertones – Notice if your counters are warm or cool, then match that temperature in your cabinet color
- Use complementary palettes – Pick cabinet colors that echo your backsplash tones for unity
- Test samples first – Place cabinet swatches next to your countertops in different lighting to see how they interact
- Consider your flooring – Ensure cabinet colors connect the whole room together visually
This approach creates a space where everything works together in a deliberate way. You’re building a kitchen where each element belongs with the others, and that’s what makes it feel like home.
Creating Visual Harmony
The cabinet-countertop connection is what makes or breaks your kitchen’s look. I’ve learned that matching your cabinet color to surrounding materials creates a unified appearance that feels carefully planned. When you select complementary palettes, countertops and flooring work together with cabinetry throughout the space.
Here’s my approach: try a two- or three-color strategy. Maybe pair white cabinets with marble countertops and subway tile backsplash. This keeps things polished while ensuring your cabinet color supports everything around it.
Before committing, test colors in your actual kitchen under different lighting. Morning light differs from afternoon glow, and that matters! Check how your chosen cabinet shade interacts with granite, quartz, or tile finishes.
I always assess existing decor too. Does your backsplash pattern clash with cabinet tones? Visual discord ruins the whole effect. Balance everything thoughtfully, and you’ll create a kitchen that truly feels like yours.
Testing Colors In Context
Now that you’ve got a color strategy in mind, it’s time to see it actually work in your space. I can’t stress this enough; colors look totally different depending on lighting and surrounding materials.
Here’s what I do:
- Get paint swatches from your cabinet supplier and tape them directly onto your existing countertops
- Observe them under morning, afternoon, and evening lighting conditions
- Check how they interact with your backsplash materials and flooring
- Live with the swatches for several days before deciding
Testing colors in context reveals how they’ll actually perform. Natural light hits differently than kitchen overhead lights. Your granite countertop might make one shade pop while another disappears completely.
This real-world testing prevents expensive mistakes and ensures that colors work together across your entire kitchen. This step makes a significant difference in your whole refacing project.
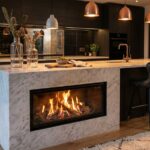
Brighten Your Kitchen With Reflective Finishes and Glass Doors
Want to make your kitchen feel bigger and brighter without knocking down walls? I’ve discovered reflective finishes and glass doors work well. They bounce light around, instantly expanding your space visually.
Glass doors let you display your favorite dishes while keeping that airy feel. I skip heavy full-glass fronts; partial glass inserts do the job beautifully. Pair reflective cabinet finishes with glossy backsplashes for maximum impact.
Here’s my favorite trick: combine lighter upper cabinets with darker bases. This two-tone approach creates depth. Add open shelving above cabinets for that light-filled, uncluttered look.
| Feature | Benefit |
|---|---|
| Glass inserts | Display + airiness |
| Reflective finishes | Mirrors light |
| Two-tone cabinets | Enhanced depth |
| Open shelving | Open feel |
| Glossy backsplash | Extra brightness |
Test everything under your actual lighting first. It really does make a difference.
Swap Hardware and Doors for an Instant Designer Refresh

I’m telling you, swapping out your cabinet hardware is like putting jewelry on your kitchen. New knobs and pulls cost way less than a full cabinet overhaul, yet they completely change how your space looks and feels.
You’ve got tons of options too, from custom doors designed exactly how you want them to budget-friendly stock or ready-to-assemble choices that still deliver a polished, high-end appearance.
Hardware as Kitchen Jewelry
Kitchen hardware deserves way more credit than it gets. I’m talking about your cabinet doors and drawer pulls, your kitchen’s jewelry box. When you swap out old hardware for something fresh, the change happens fast and won’t break the bank.
Here’s what makes hardware so powerful:
- Updates your entire kitchen look without replacing cabinets
- Works across all budget levels and design styles
- Takes just an afternoon to install with proper planning
- Makes your space feel carefully chosen and polished
I’ve learned that matching hole centers matters when installing new drawer pulls. Use a hardware jig for precise drilling every time.
Consider adding backplates to cover old holes for that perfect finish you’re after. This approach delivers designer-level results without the designer price tag.
Door Replacement Options Available
Why stop at hardware when your cabinet doors deserve an upgrade too? I’ve found that door replacement options refresh your entire kitchen aesthetic. You can choose custom doors designed to your exact specifications, semi-custom doors blending prefab elements with personalization, or stock options for budget-conscious refacing ideas. Ready-to-assemble doors offer another practical route.
Here’s what excites me most: adding classic or skinny molding to plain doors elevates them instantly. Shaker and slab styles become designer-worthy with these hardware upgrades. I recommend working with suppliers like Nieu Cabinet Doors to achieve that high-end look you’re craving.
Replacing cabinet doors gives your kitchen new life without full replacement costs. Pair fresh doors with updated hardware, and you’ve created something special. It’s a straightforward way to update your space.
Budget-Friendly Designer Transformations
How’s this for a kitchen win? I’m showing you how cabinet refacing gives your kitchen a fresh new look without breaking the bank.
Here’s what makes this budget-friendly approach work so well:
- Swap old hardware for stylish pulls and knobs; instant style for your cabinets
- Replace doors with stock or RTA options that fit your style and wallet
- Add veneer options like self-adhesive finishes for a completely refreshed look
- Layer in molding and decorative toe kicks for that custom, built-in feel
These hardware upgrades and door replacements deliver designer results at a fraction of remodel costs. You’re getting that high-impact renovation you want without the hefty price tag. Cabinet refacing lets you join the “smart renovator” club by achieving beautiful results through strategic, practical choices that actually work within your budget.
Go Floor-to-Ceiling: Why Tall Cabinets Feel Bigger

Ever notice how your eyes instinctively travel upward in a room? That’s the appeal of tall cabinets! When you extend your uppers to the ceiling, you’re not just gaining storage. You’re creating a built-in look that gives your entire kitchen a more polished appearance.
Here’s what happens: your ceiling height suddenly feels taller. The space breathes differently. Your door style matters too—sleek, modern doors emphasize that seamless finish.
I’ve seen kitchens completely change with this simple shift. Dust stops collecting on top surfaces. Everything looks intentional and connected.
The secret is proper measurements. Your cabinet dimensions must match your ceiling height perfectly. Pair them with crown molding for that furniture-like appearance.
You’re essentially building a cohesive, balanced design. The result is a kitchen that feels spacious and well-considered. That’s the floor-to-ceiling advantage.
Care for Your Refaced Cabinets: Maintenance Tips for Longevity

Your beautiful new cabinets deserve care that keeps them looking fresh! I’ve learned that maintaining your refaced cabinets is easier than you’d think. Here’s what I do:
- Clean regularly with a soft cloth and mild detergent to protect the finish
- Skip harsh chemicals that scratch veneer and degrade surfaces over time
- Check edges periodically for lifting or gaps, then reseal as needed
- Use touch-up kits on small chips to prevent moisture damage
I also keep humidity control between 40-60% in my kitchen. This prevents wood movement and extends cabinet life significantly.
For veneer maintenance, I inspect joints carefully each month. Edge adhesion stays strong when I catch problems early. Small touch-up repairs now save big headaches later. These simple steps keep your investment beautiful!